How to customize your ROG Raikiri II Pro PC controller
As our most customizable gamepad ever, the ROG Raikiri II Pro PC controller gives you a lot to tinker with. From its buttons and thumbsticks to its built-in display, polling rate, and stick deadzone, nearly everything can be tweaked to your liking. Here's an overview of how to make the Raikiri II Pro PC your own.
Swap your joystick caps, joystick modules, and rear buttons

Everyone likes their gamepad to feel a certain way in their hands. That's why we give you the flexibility and tools you need to thrive with the Raikiri II Pro PC.
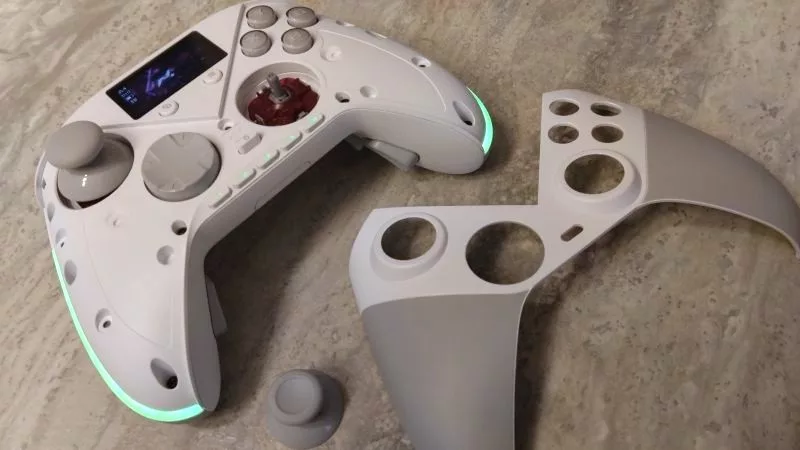
Start with the basic feel of the thumbsticks. Some players like a gripless, smooth joystick cap; others prefer a stick with a longer neck for pinpoint precision. We include both options with the Raikiri II Pro PC so you can tailor the gamepad to your preference. To swap caps:
- Remove the magnetically attached controller faceplate.
- Gently tug the existing caps off the TMR modules by hand.
- Slot your preferred caps onto the modules' pegs.

You can also swap the TMR modules themselves, whether you want to change the feel of your sticks or replace modules that have seen thousands of hours of hardcore gaming. We include an extra set of modules in the box that have lower spring tension. To swap a TMR module:
- Remove the controller faceplate and the joystick caps.
- Use the included module removal tool to clamp the north and south ends of the module you want to replace, then gently tug upward to lift it out.

- Slot in the new TMR module, making sure the north and south ends aren't facing west and east.
- Check that the gold circles on the back of the module line up with the gold circles in the module slot to confirm it's oriented correctly.

- Press the new module in until you hear it click into place.
Next, check out the four removable micro-switch rear buttons on the handles of the gamepad. If you want those extra inputs, leave them in place. If you'd rather not risk accidentally tapping buttons you're not using, gently tug them off with your fingers, then magnetically snap on the optional button covers included with your controller for smooth, button-free grips.
Lastly, look at the back of the controller for the small switches you can slide up or down. These let the dual-mode triggers alternate between micro-switch triggers with short travel for rapid-fire precision, and TMR sensor triggers with smooth, full-range analog control. The former is great for esports and shooters, while the latter provides an immersive trigger feel perfect for racing games and simulators.
Fine-tune controller settings from the built-in display
You can handle a lot of customization directly from the Raikiri II Pro PC's built-in display. Hold the square display control button, located beneath the power button, for three seconds to open the on-screen control menu.

The first menu you’ll see is Profile Change. This lets you switch between saved profiles. Save one set of controller settings — like a specific macro or button mapping — to one profile and a different set to another, then swap between them whenever you want.

It's handy for games that need their own unique setup. Before you start tweaking, choose the profile here that you want to change.

The next menu, Button Setting, is where you can remap almost all of the controller's buttons, set macro inputs, or enable Turbo mode on buttons of your choice — a feature that triggers rapid auto-repeat while the button is held down, so your finger doesn't tire out from mashing.

Select button remapping, macro recording, or Turbo, then choose from all the controller's customizable buttons, including the face buttons, triggers, bumpers, and the F1, F2, F3, and F4 buttons along the bottom of the controller. At that point, you’ll be able to rebind the button, set a macro input for it, or enable Turbo mode on it. Make your desired changes, then press the menu button to confirm them.

The rest of the on-screen control menu options are straightforward: Lighting Effect and Lighting Brightness adjust your controller's RGB pattern and brightness, Animation Setting lets you pick the animation your built-in display shows, and Display Brightness changes how bright the display runs. Vibration controls how much rumble your Raikiri II Pro PC produces, and Calibration lets you confirm your sticks and triggers are operating as intended.
Customize even more with Gear Link
You can go even deeper with your Raikiri II Pro PC using our web app, Gear Link. It features even more settings than the controller’s built-in adjustments do.

Under the Settings menu on the Raikiri II Pro PC Gear Link page, you'll find a trigger-tuning menu where you can adjust trigger sensitivity with sliders. The next tab, Stick, lets you fine-tune your stick's deadzone and outer threshold using sliders and an adjustable graph. The Button Settings and Vibration tabs let you tweak those same functions as you can on the controller itself. All these settings work together to let you fine-tune your controller’s handling to your specific preferences.

The Performance menu lets you adjust the gamepad's polling rate with a slider — useful whether you want peak responsiveness or when you'd rather lower the polling rate to conserve battery life.
The Screen menu lets you change what appears on your controller's display. You can choose from a few preset animations, upload your own imagery (JPEG, PNG, and GIF files are supported), and even show information like the date and time or your laptop's battery status.

In the Power menu, you can check your gamepad's battery level, set idle-mode timers to conserve battery life, and adjust when the lights blink to warn you that you're running low on juice.
Gear Link also gives you enhanced control over your gamepad's RGB, letting you set individual zone lighting, pick specific hues, and more — so you can light up your gamepad exactly the way you want.
Play your way with the Raikiri II Pro PC controller
Between swappable hardware, onboard controls that let you tweak everything from button mappings to vibration power, and a full suite of tuning options through Gear Link, the Raikiri II Pro PC controller is built to be customized. So grab your gamepad and start tinkering until you have a controller perfectly tuned to the way you play.
Author
Popular Post

The ROG XREAL R1 gaming glasses let you game anywhere on a 171-inch 240Hz virtual screen
How to adjust your laptop's P-Cores and E-Cores for better performance and battery life
How to Cleanly Uninstall and Reinstall Armoury Crate

Innovate. Perform. Dominate: Celebrate 20 years of gaming with the ROG Edition 20 lineup of PC components and gear
Brighter, bolder, better: The ROG XBOX Ally X20 bundles a larger OLED display with AR gaming glasses
LATEST ARTICLES
How to customize your ROG Raikiri II Pro PC controller
As our most customizable gamepad ever, the ROG Raikiri II Pro PC controller lets you tinker with its buttons, thumbsticks, built-in display, and more.

How to clean your mouse pad
With a few simple steps, you can help preserve your mouse pad's performance and keep your desk mat looking as sharp as the rest of your setup.
How to clean your OLED monitor
Keeping your OLED monitor looking pristine is surprisingly simple. You just need a microfiber cloth and the right technique.